I’ve been so excited to share this for awhile now, but I’ve had to wait because this was a Christmas gift. I saw this glass etching awhile ago on Pinterest, and I decided to give it a real shot for presents this year!
If you’re looking for something crafty, unique, and useful, with a nice, personal touch, then this is the project for you!
Just FYI, I used this tutorial as a baseline for my project; however, I do not have a fancy Cricut cutter, so my tutorial is a little bit different. If you have a Cricut cutter, head on over to the original tutorial, but if you don’t, stick here with me!
Materials:
- The glass to etch (I used Kinetic glasslock containers on Amazon). They worked really well, but note that the dimensions listed on Amazon aren’t accurate, so they were smaller than I thought! When they say 30 oz, they mean the container’s weight, not what it holds.
- Etching cream. I bought mine from Michael’s (a Martha Stewart brand) but a friend of mine used Armour Etch and that also worked great. Just be sure you’re buying an etching cream, not just something that’s going to sit on the surface of the glass.
- Brush (that you don’t mind throwing away). My etching cream actually came with one.
- Clear contact paper. I also got this from Michael’s–one roll lasted me for 16 different containers, so don’t worry about it not being enough! Clear is useful for tracing, which we’ll get to later.
- X-acto knife. I started with scissors and an epic fail. Spending the couple bucks for the X-acto knife is worth it!
- Latex gloves.
- A computer and printer.
How-To:
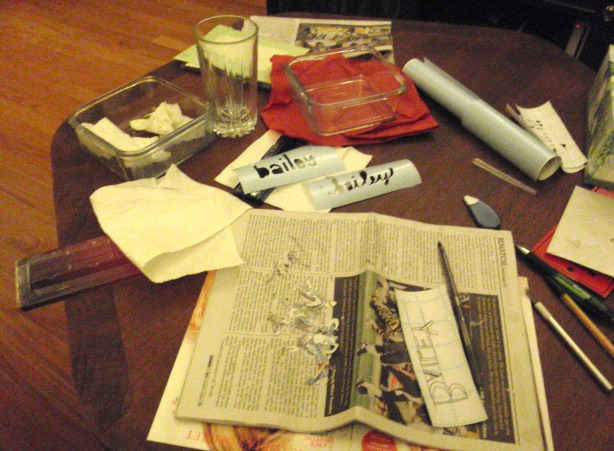
1) On the computer, open Microsoft Word (or any other program with different font options) and type in what you eventually want on the glass). Size it so it’s the size you want on the glass, and print it out.
2) Put this piece of paper behind your contact paper and trace it, so that the words are now on the contact paper. It’s going to be a little hard to see, but you’re just getting it down on the contact paper so that you know where you’re going to cut.
3) Cut out the letters on the contact paper. (This is going to take some time; be patient!)
There are a couple things you need to remember when doing this:
- Using the example above, anything black is what is getting cut out. That means that you don’t want a bunch of cut marks on the part in white, because the etching cream might get through it.
- If you have letters that have closed circles in them (A, B, D, O, etc.) you need to keep those tiny pieces. In the example above, that font allows for the “a” and “e” to just be completely filled in, but most fonts don’t do that. By keeping those little circles, you can get the letters more accurate.
When you’re finished cutting it out, set the cut-out aside for a moment. Also, if you’re doing more than one glass piece, I would recommend cutting everything out first, and then etching everything together.
4) Clean off the piece of glass with soap and water, and dry it well. This will help the contact paper stick better.
5) Carefully take off the backing of the contact paper and place the stencil on your glass. Be sure that all bubbles are smoothed over and that the contact paper is completely sealed flush onto the glass. Any sneaky bubbles or loose edges will let the etching cream get underneath.
6) (Put your gloves on.) Brush the etching cream on the glass. Obviously, you don’t have to be exact here (that’s why the contact paper is there!) so just make sure to get the exposed glass that you want etched.
7) Leave the etching cream on for 15-20. If you pay attention, you can actually watch the cream kind of slide off the contact paper and head toward the glass part.
8) (Put your gloves on.) Rinse off the etching cream under water. This works best if you use a gloved finger and wipe at the cream, making sure that when it comes off the glass, it ends up down the drain, and not just on another part of the glass. Once all the etching cream is off, peel off the contact paper, and rinse again for good measure.
Voila–you now have a lovely, etched piece of glassware!
Also, you can always put something in the glassware to add an extra touch. For my inlaws to be, I bought dishtowels on Etsy. For the office, I put cookies in 🙂


